
みなさんは、記事内にブログカード(リンク)を設置していますか?
自分が書いた文章の中に、自社サイトのURLを貼る事を「内部リンク」、他者サイトに自社サイトのURLを貼ってもらうことを「外部リンク」と言いますが、実はリンクの設置はSEO的にも非常に重要な要素となります。
そして、文字数が多い記事などでは、画像がないリンクを挿入していても、訪問者が見逃してしまうことがあります。
そういったケースに対処するためにも、直帰率の改善に繋げることが出来る、ブログカードの設置をおすすめします。
そこで今回は、ブログカード(リンク)の挿入方法をプラグイン以外の作り方も含めて詳しくご紹介しますので、ぜひ最後まで読んでいただけたらありがたいです。
プラグインを使ってブログカードを挿入する方法
ブログカードのプラグインとして有名なのは 「Pz-LinkCard」です。
特徴としては、 ショートコードで簡単にブログカードを設置できるのと、CSS で様々なデザインに装飾することができます。
functions.phpでブログカードを挿入する方法
編集する前に必ずバックアップを取ってください。
ショートコードを使用しない場合
以下のコードをfunctions.phpに書き加えて下さい。
//ブログカード用コード
// 記事IDを指定してdescriptionを取得
function ltl_get_the_excerpt($post_id){
global $post;
$post_bu = $post;
$post = get_post($post_id);
setup_postdata($post_id);
$output = get_post_custom($post_id)['_aioseo_description'][0];//AllinOneSEOの場合
$post = $post_bu;
return $output;
}
//ショートコード
function nlink_scode($atts) {
extract(shortcode_atts(array(
'url'=>"",
'title'=>"",
'excerpt'=>""
),$atts));
$id = url_to_postid($url);//URLから記事IDを取得
$no_image = '';//アイキャッチ画像がない記事に使う画像URL
//記事タイトルを取得
if(empty($title)){
$title = esc_html(get_the_title($id));
}
//descriptionを取得
if(empty($excerpt)){
$excerpt = esc_html(ltl_get_the_excerpt($id));
}
//アイキャッチ画像を取得
if(has_post_thumbnail($id)) {
$img = wp_get_attachment_image_src(get_post_thumbnail_id($id),'medium');
$img_tag = "<img src='" . $img[0] . "' alt='{$title}'/>";
}else{
$img_tag ='<img src="'.$no_image.'" alt="" width="'.$img_width.'" height="'.$img_height.'" />';
}
$nlink .=' <div>
<a class="card-link longcard-link" href="'. $url .'" title="'.$title.'" target="_blank" rel="noopener">
<span class="longcard-img">'. $img_tag .'</span>
<span class="blogcard-content blogcard-text">
<span class="blogcard-title">'. $title .' </span>
<span class="blog-card-excerpt-long">'. $excerpt .'</span>
</span></a></div>';
return $nlink;
}
add_shortcode("nlink", "nlink_scode");
8行目は状況に合わせて変更してください。
//AllinOneSEOを使っている場合:そのままでOK
$output = get_post_custom()['_aioseo_description'][0];//AllinOneSEOの場合
//YoastSEOを使っている場合:上記のコードを以下のコードに変更する
$output = get_post_meta($post_id,'_yoast_wpseo_metadesc',true);//YoastSEOの場合
//どっちも使っていない場合:上記のコードを以下のコードに変更する
$output = get_the_excerpt();
そして、以下のCSSコードも記入してみて下さい。
ベーシックなデザイン/* ブログカード シンプルデザイン*/
.blog-card-long {
margin: 0 0 1.8rem;
}
.card-link {
display: block;
overflow: hidden;
max-width: 400px;
width: 100%;
padding: 0;
border-radius: 3px;
background: #fff;
box-shadow: 0 2px 4px rgba(0, 0, 0, 0.25);
color: #555;
font-weight: bold;
text-decoration: none !important;
position: relative;
}
.card-link:hover {
box-shadow: 0 5px 15px rgba(0, 0, 0, 0.25);
color: #888;
text-decoration: none;
transform: translateY(-2px);
}
.blog-card-label-long{
z-index: 1;
display: inline-block;
position: absolute;
background-color: #f99f48;
top: 10px;
left: 10px;
max-width: 120px;
height: 25px;
padding: 0 0.5rem;
color: #fff;
font-size: .8rem;
font-weight: 700;
text-align: center;
line-height: 25px;
transform-origin: 50% 50%;
animation: animScale 3.5s ease-out;
}
.card-link .blogcard-text {
display: block;
padding: 15px 13px;
line-height: 1.6;
}
.card-link img {
width: 100%;
}
.longcard-link {
margin-bottom: 1.5em;
box-shadow: 0 1px 5px 0 rgba(0, 0, 0, 0.25);
}
.longcard-link img {
padding: 10px 10px 0;
}
.longcard-img{
position: relative;
}
.blogcard-title {
font-size: 1em;
font-weight: bold;
line-height: 1.4;
display: -webkit-box;
-webkit-box-orient: vertical;
-webkit-line-clamp: 3;
overflow: hidden;
text-overflow: ellipsis;
}
.blog-card-excerpt-long {
padding-top: .8em;
font-size: .8em;
line-height: 1.4;
font-weight: normal;
opacity: .8;
color: #333;
display: -webkit-box;
-webkit-box-orient: vertical;
-webkit-line-clamp: 2;
overflow: hidden;
text-overflow: ellipsis;
}
@media only screen and (min-width: 481px) {
.card-link {
display: inline-block;
max-width: 310px;
margin-right: 20px;
}
.longcard-link {
max-width: 100%;
display: table;
}
.longcard-img,
.card-link.longcard-link .blogcard-content {
display: table-cell;
vertical-align: middle;
}
.longcard-img {
width: 40%;
}
.blogcard-content {
width: 60%;
}
.longcard-img img {
width: 100%;
padding: 10px;
}
}
@media screen and (max-width: 959px){
.blog-card-excerpt-long {
display: none;
}
}/* ブログカード ポップなデザイン*/
.blog-card-long {
margin: 0 0 1.8rem;
}
.card-link {
display: block;
overflow: hidden;
max-width: 400px;
width: 100%;
padding: 0;
border-radius: 9px;
border:3px solid #ffb36b;
background-color: #fffbf5;
box-shadow: 0 2px 4px rgba(0, 0, 0, 0.25);
color: #555;
font-weight: bold;
text-decoration: none !important;
position: relative;
}
.card-link:hover {
box-shadow: 0 5px 15px rgba(0, 0, 0, 0.25);
color: #888;
text-decoration: none;
transform: translateY(-2px);
}
.blog-card-label-long{
z-index: 1;
display: inline-block;
position: absolute;
background-color: #f99f48;
top: 10px;
left: 10px;
max-width: 120px;
height: 25px;
padding: 0 0.5rem;
color: #fff;
font-size: .8rem;
font-weight: 700;
text-align: center;
line-height: 25px;
transform-origin: 50% 50%;
animation: animScale 3.5s ease-out;
}
.card-link .blogcard-text {
display: block;
padding: 15px 13px;
line-height: 1.6;
}
.card-link img {
width: 100%;
}
.longcard-link {
margin-bottom: 1.5em;
box-shadow: 0 1px 5px 0 rgba(0, 0, 0, 0.25);
}
.longcard-link img {
padding: 10px 10px 0;
}
.longcard-img{
position: relative;
}
.blogcard-title {
color:#337ab7;
font-size: 1.2em;
font-weight: bold;
line-height: 1.4;
display: -webkit-box;
-webkit-box-orient: vertical;
-webkit-line-clamp: 3;
overflow: hidden;
text-overflow: ellipsis;
}
.blog-card-excerpt-long {
padding-top: .8em;
font-size: .8em;
line-height: 1.4;
font-weight: normal;
opacity: .8;
color: #333;
display: -webkit-box;
-webkit-box-orient: vertical;
-webkit-line-clamp: 2;
overflow: hidden;
text-overflow: ellipsis;
}
@media only screen and (min-width: 481px) {
.card-link {
display: inline-block;
max-width: 310px;
margin-right: 20px;
}
.longcard-link {
max-width: 100%;
display: table;
}
.longcard-img,
.card-link.longcard-link .blogcard-content {
display: table-cell;
vertical-align: middle;
}
.longcard-img {
width: 40%;
}
.blogcard-content {
width: 60%;
}
.longcard-img img {
width: 100%;
padding: 10px;
}
}
@media screen and (max-width: 959px){
.blog-card-excerpt-long {
display: none;
}
}ショートコードを使用する場合
ショートコードを利用できる記述も紹介します。
先程と同様にfunctions.phpを追記します。
// 記事IDを指定して抜粋文を取得
function ltl_get_the_excerpt($post_id){
    global $post;
    $post_bu = $post;
    $post = get_post($post_id);
    setup_postdata($post_id);
    $output = get_the_excerpt();
    $post = $post_bu;
    return $output;
}
// 内部リンクをはてなカード風にするショートコード
function nlink_scode($atts) {
    extract(shortcode_atts(array(
        'url'=>"",
        'title'=>"",
        'excerpt'=>""
    ),$atts));
    $id = url_to_postid($url); // URLから投稿IDを取得
    $no_image = 'noimageに指定したい画像があればここにパス'; // アイキャッチがない場合の画像を指定
// タイトルを取得
    if(empty($title)){
        $title = esc_html(get_the_title($id));
    }
// 抜粋文を取得
    if(empty($excerpt)){
        $excerpt = esc_html(ltl_get_the_excerpt($id));
    }
// アイキャッチ画像を取得
    if(has_post_thumbnail($id)) {
        $img = wp_get_attachment_image_src(get_post_thumbnail_id($id),array($img_width,$img_height));
        $img_tag = "<img src='" . $img[0] . "' alt='{$title}' width=" . $img[1] . " height=" . $img[2] . " />";
    }
    else{
        $img_tag ='<img src="'.$no_image.'" alt="" width="'.$img_width.'" height="'.$img_height.'" />';
    }
    $nlink .='
    <div class="blog-card">
    <a href="'. $url .'">
    <div class="blog-card-thumbnail">'. $img_tag .'</div>
    <div class="blog-card-content">
    <div class="blog-card-title">'. $title .' </div>
    <div class="blog-card-excerpt">'. $excerpt .'</div>
    </div>
    </a>
    </div>';
    return $nlink;
}
add_shortcode("nlink", "nlink_scode");
[nlink url=”目的のページアドレス”]を、ブログカードを設置したい場所に入力し、「目的のページアドレス」に任意のURLを挿入して下さい。
cssのデザインも参考程度に
.blog-card {
    width: 100%;
    background: #f5f5f5;
    border: 1px solid #dddddd;
    word-wrap: break-word;
    margin: 1.5em 0 0;
    padding: 0;
}
.blog-card:hover {
    background: #dbe9f4;
}
.blog-card a {
    display: -webkit-flex;
    display: -moz-flex;
    display: -ms-flex;
    display: -o-flex;
    display: flex;
    justify-content: space-between;
}
.blog-card-thumbnail {
    width: 20%;
    padding: 10px;
}
.blog-card-thumbnail img {
    width: 100%;
    border: none;
    display: block;
    padding: 0;
}
.blog-card-content {
    width: 78%;
    line-height: 1.5;
}
.blog-card-title {
    font-size: 15px;
    font-weight: bold;
    padding: 10px 10px 10px 0;
}
.blog-card-excerpt {
    color: #333333;
    font-size: 13px;
    padding: 0 10px 10px 0;
}
CSSだけでブログカードを挿入する方法
htmlを以下のように入力します。
<div class="blogcard2">
  <div class="blogcard2-thumbnail">
    <img src="画像url" alt="">
  </div>
  <div class="blogcard2-content">
    <div class="blogcard2-title">
      ここにタイトルを入力 | サイト名
    </div>
    <div class="blogcard2-description">
      ここに説明を入力
      1行35文字×2行まで70文字以上は表示されません(幅600px時)
    </div>
    <div class="blogcard2-url">
      "ここに表示するurlを入力(1行を超過する場合は...で表示されます)"
    </div>
    <a href="ここにリンク先のurlを入力"></a>
  </div>
  <div class="blogcard2-clear"></div>
</div>
「画像url」と「ここに表示するurlを入力」に任意のURLを挿入します。
cssはこちら
/***** BlogCard *****/
.blogcard2 {
  border: solid 1px #e1e1e1;
  padding: 10px;
  position: relative;
  background-color: #fafafa;
  margin-bottom: 30px;
}
.blogcard2:hover {
  background-color: #f0f0f0;
}
.blogcard2-thumbnail {
  display: flex;
  align-items: center;
  width: 145px;
  height: 145px;
  float: left;
 }
.blogcard2-thumbnail img {
  width: 135px;
  max-height: 135px;
}
.blogcard2-content {
height: 145px;
}
.blogcard2-title {
  font-size: 18px;
  font-weight: bold;
  color: #dd859c;
  height: 3em;
  overflow: hidden;
}
.blogcard2-description {
  font-size: 12px;
  color: #7b7b7b;
  height: 3em;
  overflow: hidden;
  padding-top: 10px;
  margin-bottom: 10px;
}
.blogcard2-url {
  font-size: 12px;
  color: #dd859c;
  padding-top: 10px;
  border-top: dashed 1px #e1e1e1;
  height: 1.5em;
  overflow: hidden;
  white-space: nowrap;
  text-overflow: ellipsis;
}
.blogcard2 a {
  position: absolute;
  top: 0;
  left: 0;
  width: 100%;
  height: 100%;
}
.blogcard2-clear {
  clear: left;
}外部ツールを使ってブログカードを挿入する方法
embed.lyは、ブログカードを簡単に生成することができるサイトです。
使い方は、アカウントを作成し、 対象記事の URL をコピーしてコードを生成します。
ブログカードが使えるテーマを選ぶ
無料テーマのcocoonは、「囲みブログカードラベル」を使うことで簡単にブログカードを設置することができます。
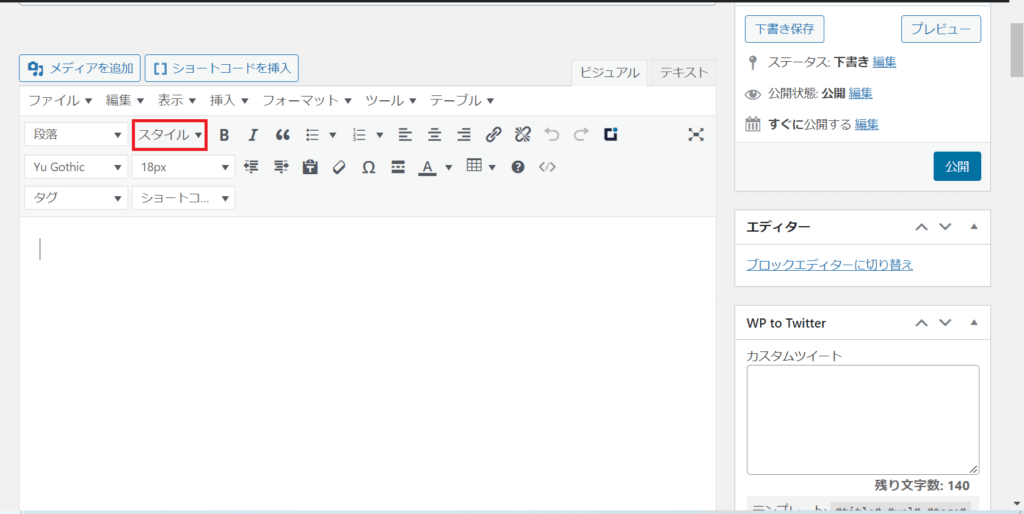
実際に設定してみます。
「スタイル」をクリックします。
「囲みブログカードラベル」を選択します。
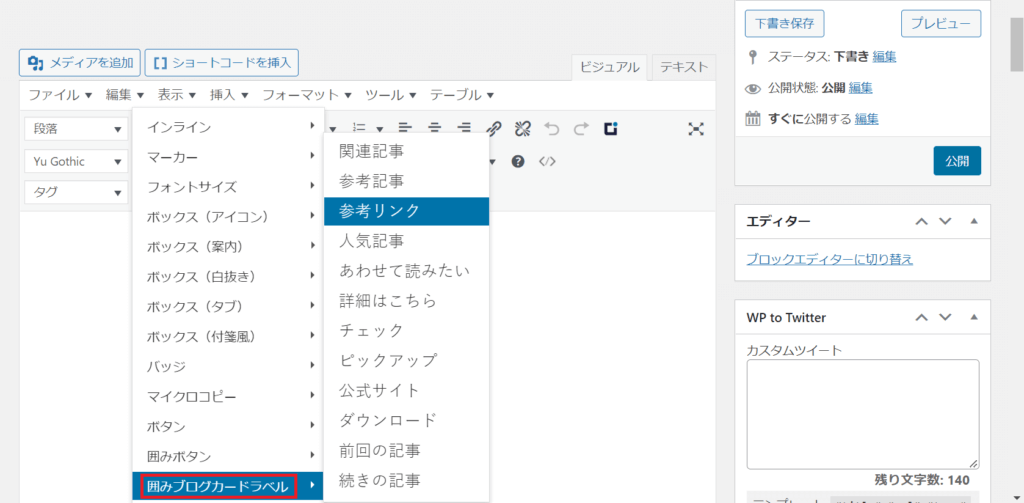
今回は参考リンクにしてみました。
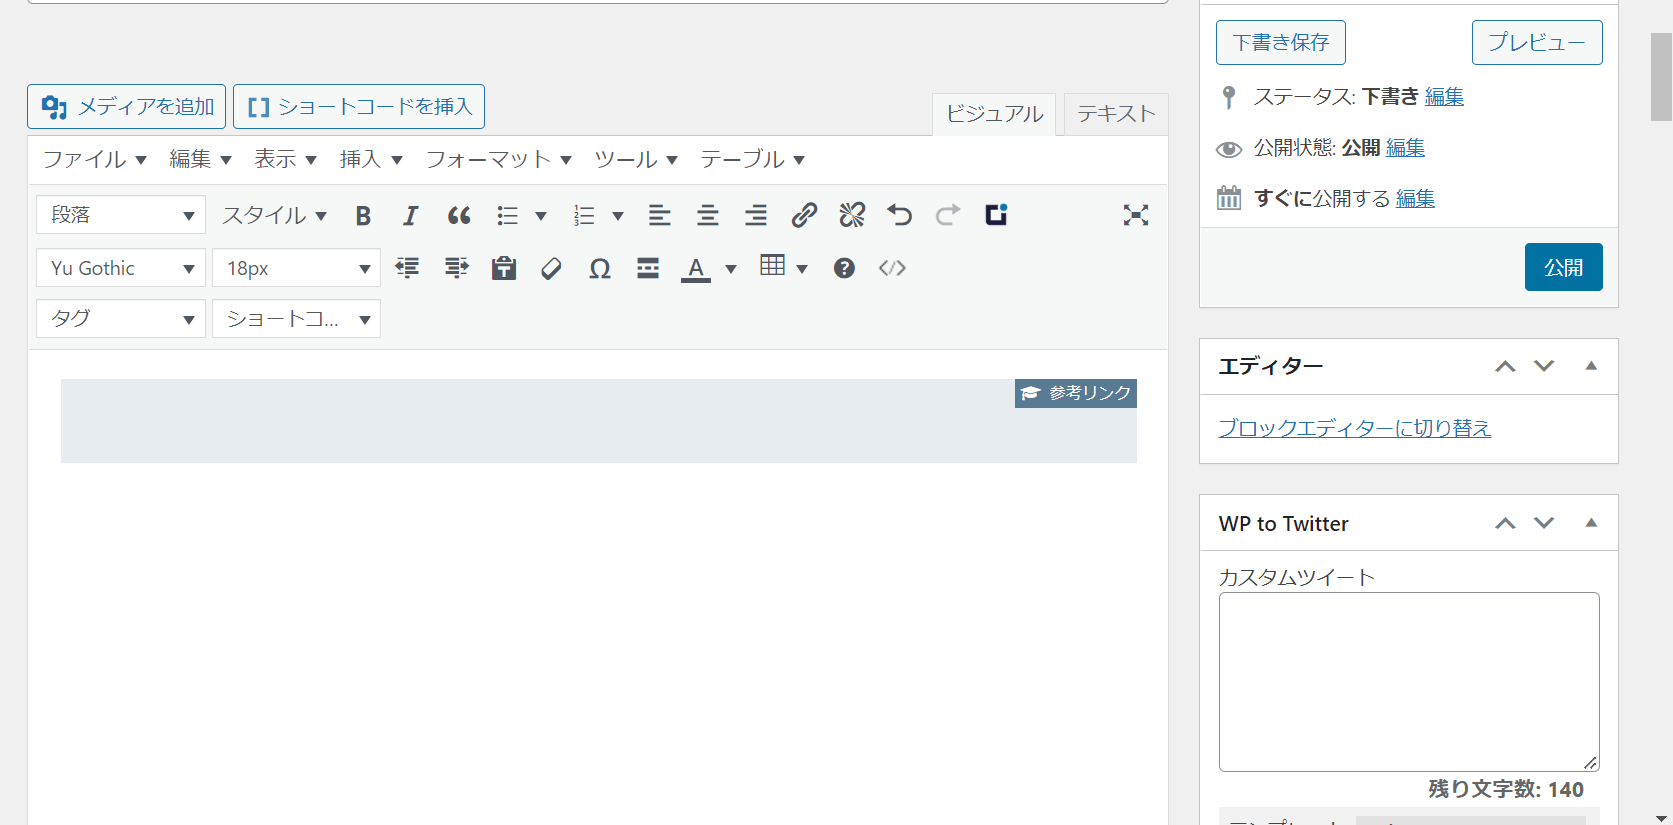
囲みの右上に「参考リンク」のラベルが貼られています。
URLを入力するだけで簡単にブログカードが生成できます。
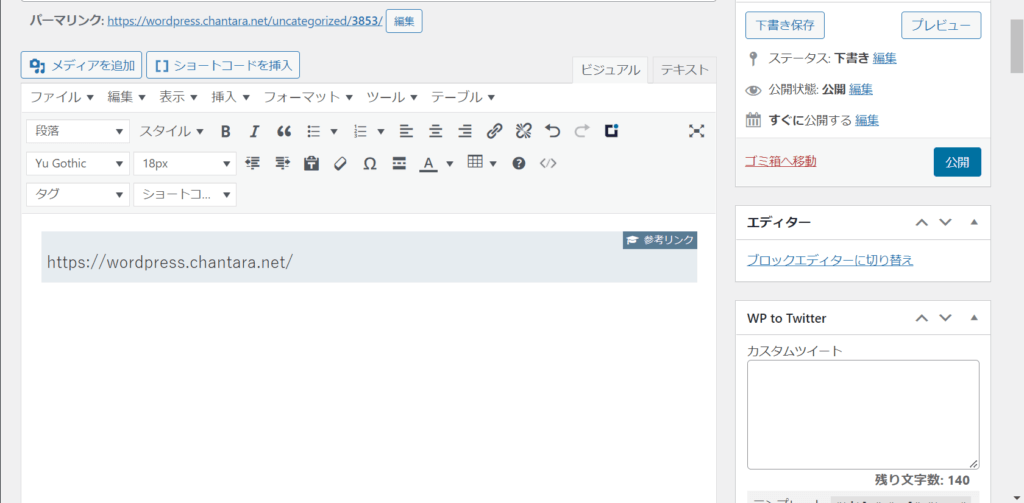
実際にプレビューを確認してみます。
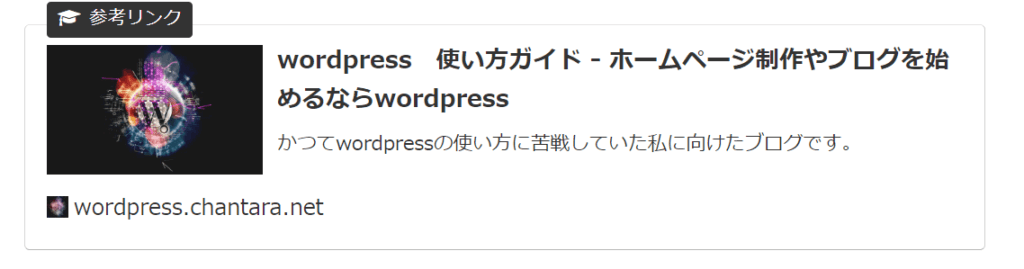
見やすいですね。
CSSで枠の色や背景色を変えることも可能です。
疑似要素の「after」などを使えば、ラベルのカスタマイズも可能ですよ。
こちらは私が運営しているペットサイトのブログカードです。
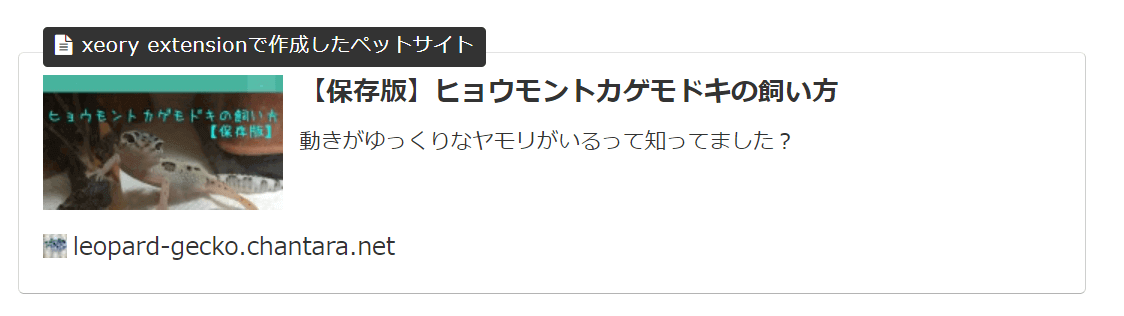
カスタマイズ次第で様々なブログカードを作ることができますので、この機会にぜひ活用してみてください。
以上がブログカードの作成方法の紹介となります。
最後までお読みいただき、ありがとうございました。